There's Fred Keller
By Jack Cox
The past twelve months have been trying times for light airplane owners and, particularly, homebuilders. Somehow we have muddled through the anti-noise fiasco, shortages of aircraft spruce, higher costs for everything, ELTs and, now, the beginnings of a gasoline shortage. It takes a gritty dude to keep his head in the clouds in the face of all this political and economic folderol ... but we've got 'em in EAA.
Back when such things as ambition, drive and hard work were considered socially acceptable, the poet Longfellow once nagged us, in verse, to be " ... a hero in the strife." Well, any man or woman who successfully completes an airplane can qualify for at least a degree of hero status, but once or twice in a coon's age a story comes along that can still rate a fervent "Wow!" even in the company of jaded aircraft wood butchers and tin benders.
Fred Keller of Anchorage, Alaska is the man we're going to talk about here, and we'll start by saying that Henry Wadsworth Longfellow would have been as pleased as punch with Fred.
If you were at Oshkosh, you know who Fred Keller is - if you weren't, then an introduction is in order. Fred showed up early in the week all red-eyed and disheveled after having driven a pickup truck with a trailer in tow straight through from Anchorage, Alaska ... 3,800 miles, 1200 of which were over the Alcan Highway's gravel road and with 400 of those so bad that only 20-25 m.p.h. could be maintained!
Obviously, here was a man who wanted to get to Oshkosh somethin' awful!
After a long-overdue night's sleep, Fred and an equally long-suffering friend who accompanied him on the trip south were on the field bright and early the next morning to unload the contents of their enclosed trailer. The few minutes of anonymity they enjoyed while emptying that trailer were to be their last for the next seven days.
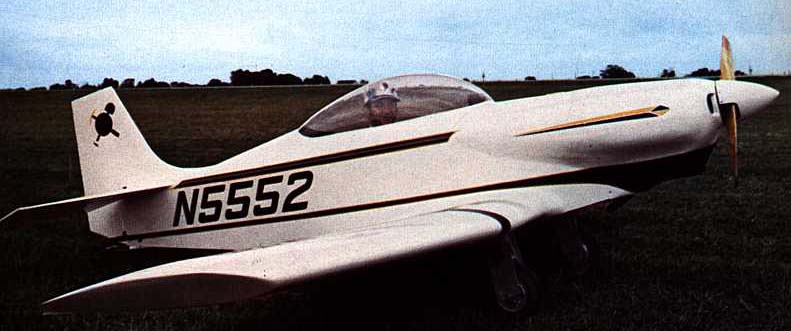
From its wheeled, plywood cocoon, Fred trundled out a tiny little airplane that from spinner to tail had one of the two or three finest finishes ever seen at an EAA Fly-In. The bird was instantly recognizable as a KR-1 with a few modifications, which was reason enough for a mob to be around it all week, but the workmanship was the thing that kept 'em coming back for one more look ... or the unlikely chance of getting a few pictures.
Your editor, realizing that there was bound to be a lot of interest in the first plans-built KR-1 to appear at Oshkosh -- particularly one exhibiting such beautiful workmanship, managed to whisk Fred away to a quiet place and start interviewing him for this story. It didn't take long to realize that here was more than your run-of-the-mill "I-built-it-like-this" tale.
The first shocker was that the airplane hadn't even been started until September of 1972 ... 11 months prior to the time we were sitting there at Oshkosh talking about it. I had to be impressed with the short building period because the KR-1 had been a part time project, but the most significant thing was that it had been built that rapidly and yet was simply beautiful. Anybody can slap together a dog and get into the air in a hurry, but here was an Oshkosh-caliber showpiece finished and flown in less than a year!
Being a little suspicious by nature, my next questions were:
"Are you an A & P ... or a cabinet-maker... or a boat maker by trade?"
"What sort of well-equipped shop did you have - or have access to?"
"How many airplanes had you already built?"
The answers were, in order:
"I am a Construction Planner and Co-ordinating Supervisor for the Anchorage Telephone Utility - never worked on airplanes."
"In order to build the KR-1 I had to rent a part of a T-hangar and heat it enough during the winter to be able to glue." -- "My only tools were ordinary household tools and a skill saw I got out of a friend's trash barrel - all it needed was a new bearing." -- "Whatever else I needed, I had to make ... like clamps from pieces of 2 x 4."
"I had never built an airplane before this one. In fact, I had never really built much of anything - except model airplanes
Now, my curiosity was really piqued. Ken Rand had tried hard the year before to convince me that his KR-1 was a snap to build ... but I knew ol' fast talking Ken had been building foam and epoxy models for years so that the KR-1 probably was a snap for him. What I wanted to know was how things would go when others tried building using his plans. It was beginning to look like Ken was a straight arrow right down the line, but I wanted some specific information, so I asked Fred Keller to start from the day he hacked out his first chunk of spruce and give me a blow-by-blow account of his building of the airplane. It went like this ...
After getting the plans package from Ken, a short period of study followed that resulted in the decision to build the fuselage first. Two things were done to get the ball rolling -- the hangar/workspace already mentioned was rented at Merrill Field in Anchorage and a spruce board of aircraft quality was purchased at a local lumber yard. The board was 10 inches wide, 1 1/2 inches thick and 25 feet and 6 inches long... from this board Fred was to cut every piece of wood needed to build the KR-1 except the outer, front wing spars (which were fir).
And he did it all with his trusty derelict from the trash heap, his skill saw with the new bearing!
The fuselage stringers, uprights and diagonals were cut from "that board" and gussets were cut from plywood that had been ordered from Aircraft Spruce and Specialty in Fullerton, California -- air freight delivery had taken about 10 days. With the heat turned up in the hanger, the basic fuselage box was glued and nailed together in a few working days.
Shortly after the project was under way, Fred realized he would never be able to find all the aluminum called for in the plans in Alaska, so he broke down and ordered the entire $75 kit from Ken Rand. This included the stubby landing gear legs, the retract hinge mechanism and enough raw stock to make everything else needed. He also ordered the wheels and brakes Ken offers for sale and the bubble canopy... ah, the bubble! Ken sells the bubble for a reasonable $48.00 -- but when you live in Anchorage, you pay $40.00 to have it sent up by slow freight!
That frontier economy is hard on the homebuilder's wallet, friends!
The next step was to go back to "that board", cut out the center section spar stock and start assembling it on the fuselage -- of which it becomes an integral part. This center section is, in fact, the backbone of the KR-1. Everything seems to tie into it or attach directly to it: the landing gear which was attached next, the retraction mechanism and the control stick.
Here - the control stick - was where Fred began the first of several deviations from the Rand plans. He wanted a centrally mounted stick rather than Ken's side mount so some time was consumed in designing, fabricating and mounting a new system (see drawing). Fred built in control stops so that he had 23° of "up" travel in his ailerons and 15° "down", 20° of "up" in the elevator and 15° "down" and approximately 25° "left" and "right" travel in the rudder. The rudder and elevator cables were run and the heel brake system was installed during this construction stage when the fuselage was turned belly up and easy to get at.
At odd times while the foregoing was going forth - like while waiting for glue to dry or cut fingers to heal the tail feathers had been built. This was easy enough because they are nothing more than spars and end rib/formers - and plastic foam.
The next step was a biggie. The construction of the wings of a KR-1 involve a rather unique technique. The fuselage, with its by-now built-in center section, is solidly mounted in a temporary jig and the outer spars are bolted in place and also Jigged into their correct dimensional relation to the fuselage. The few rib/formers are slipped in place over the spars and then all is ready for the foam and Dynel treatment. The wings are built in place, right onto the fuselage and when completed, the outer panels are simply sawed off!
Rather than using Styrofoam, Fred chose polyurethane foam, a green, 2 pound per cubic foot insulation material he picked up at a local lumber yard. He bought thirty-five dollars worth before the plane was completed. Polyurethane foam was chosen because almost any glue can be used on it without fear of dissolving it into a gooey mess. Fred used Elmer's White Glue and Weldwood contact cement for fixing the foam blocks into place that would later be carved and sanded down into airfoils, fillets, cowls, etc.
Initial, rough cutting was done with a spare hack saw blade and the next, more careful step was accomplished with a Surfoam plane. During all this early cutting, the real problem was glue joints. Fred eventually learned to take a razor blade and slice out a shallow "V" shaped groove down the glue joint and follow by planing or sanding down to the lower level of the "V" groove. If more material needed removing, the process was repeated.
Final shaping of the foam was done largely with a sanding block, but late in the game Fred discovered that simply rubbing the glued-in-place foam with another block of foam worked wonders, particularly in forming compound curves. This works so well that Fred indicated he would do almost all the final sanding utilizing the foam-to-foam technique if he had the job to do over.
With the foam shaped and sanded to desired contours, the laying on of the Dynel and epoxy began. Fred had ordered 25 yards of Dynel cloth from Aircraft Spruce and Specialty along with 3 gallons of epoxy - at $12.00 a gallon. The quantity of cloth proved to be sufficient, however, an additional 4 1/2 gallons of epoxy were required (total of 7 1/2 gallons) before the plane was completed.
Fred used several techniques in applying the Dynel over the foam -- learning better methods as he went along. At first he coated the foam with epoxy and laid up the Dynel over it. Later, he also pre-soaked the cloth in epoxy to make it easier to apply in tight places - although he cautions that..."at NO time should the soaked Dynel be left for any length folded or in a pile because it will generate so much heat that in about one minute it will be so hard and hot you cannot handle the smoking mess!" "Besides the danger of burns, one could lose some expensive epoxy and Dynel cloth." In all, three coats of epoxy were applied to the cloth, some of which he actually rubbed in by hand with no ill effects -- a practice he does not recommend to others due to the very real danger of an allergic reaction. It would be wise to use rubber gloves here.
The next step was to sand the surfaces smooth... and this one came close to doing Fred in. He started out grinding away with a borrowed five speed disc sander and later used an orbital sander, but along the way realized something was amiss physically. A thorough check-up by his doctor revealed he had inhaled a dangerous amount of epoxy dust during the sanding. From that point on, a dust mask was used every time he even looked at a piece of sandpaper and the lung condition fortunately soon cleared up. FRED URGES ALL KR-1 BUILDERS AND ANYONE ELSE SANDING EPOXY TO USE A MASK FROM THE VERY BEGINNING AND NEVER SAND WITHOUT IT.
Before gluing on the foam, all wood surfaces had been painted with 3 or 4 coats of Varithane plastic varnish. Fred later decided not to cover the plywood sides and bottom of his fuselage with Dynel as the smoothly sanded Varithane made for a perfectly suitable surface for his paint job. He does not feel the added strength of a cloth layer over the plywood is needed here.
After the wings were completed and the epoxy had cured, the outer panel portions were cut off with a saber saw. The two panels were then laid out on a work table with the butt ends snugged together. Much to his dismay, Fred saw that the contours of his leading edges were not the same on each wing. After some hasty fitting of templates, it was evident that only one of the panels was off... so the leading edge, the portion ahead of the front spar, was simply sawed off the bad wing! A new one was built up right on the wing with very frequent fitting of the template to insure that this panel matched the other good one. "Try that with your rag or metal wings!", Fred says.
After his all-too-precious bubble canopy had arrived, Fred began the foam/Dynel build-up of the top of his fuselage. A great deal of time was spent sitting in the cockpit with the bubble over his head with much slipping of it this way and that to determine the best position for permanent mounting. With the tightness of the cockpit canopy area to start with, he wanted to be sure all switches, levers, etc. could be easily reached with the bubble in place.
With the airframe taking shape, it was time to do some thinking about the engine installation. Already showing the first symptoms of Oshkosh Fever, Fred threw caution to the wind and mailed a check to Revmaster for one of their 1700cc, dual ignition engines. Equipped with the Bendix dual mag this engine retails for $945.00 - or, at least, did at that time. It is rated at 65 h.p. for take-off and 58 h.p. at recommended cruise r.p.m. This was considerably more horsepower than Ken Rand had used in his prototype KR-1 with its little 1200cc VW, so, with the approval of his local FAA people, Fred beefed up the forward portion of his fuselage to take the extra ponies. The Revmaster engine was ordered in February of 1973 with a request that delivery be delayed until April 4. The engine was actually received on May 10. A propeller was also ordered from Les Trigg.
Fred really got fancy when it came time to build up the engine mount. In order to use the Revmaster, he had already been forced to build a bowl shaped depression in his firewall to accommodate the mag. Even so, the fit would be tight and maintenance on the rear section of the engine would be a pain ... so, the solution was a swing-out engine mount! A 4130 tubular mount very similar to those you see on a Super Cub was welded up. It is six inches long from the firewall to the center of the rear engine attach point. The mount allows the engine to be swung out as seen in the photo accompanying this text.
A swing-out mount necessitated several other changes in the engine compartment. The exhaust stacks obviously had to swing with the engine, so they are run out the bottom rear of the cowling as on many factory aircraft. The engine baffling is also similar to standard practice. On Ken Rand's prototype, the tight fitting foam/Dynel cowling itself serves as a cooling baffle. Fred's cowling, although built up right on the airplane much like Ken recommends, is split in such a way that all of it is quickly detached for removal and swing-out of the engine. The engine on Ken's KR-1 is exposed by lifting off the top portion of the cowl and the short stacks project out of the cheeks of the lower cowl portion.
Fred's 9 1/2 gallon fuel tank is built into the foam/Dynel upper portion of the fuselage -- just as on Ken's airplane -- but has an aluminum tube running down the middle of it through which the tach drive is routed. Holes were cut at each end of the tank and the tube was simply epoxied in place. The tank has a thermos jug cap fitted with a Cub-type wire/float indicator.
After the cowling was laid up, cured, split and peeled away, the foam blocks on the inside surface of the now hard Dynel outer shell were removed easily with a round wire wheel fitted to a hand drill. A 3 inch wide aluminum strip was attached around the outer edges of the firewall to act as an anchor point for screws to attach the cowling.
By this time a final scrutiny of the airframe was in order to see what was needed to prepare the bird for painting. All low spots and cracks in the Dynel shell were filled with polyester body putty and the exposed wood fuselage received a coat of lacquer primer. The entire airframe was painted in white with DuPont Imron, a polyurethane. The yellow and black trim was done in DuPont acrylic enamel.
The Keller KR-1 was finished on July 6, 1973, signed off and flown for the first time the next day. On the 10th the enclosed trailer was started and took until the 22nd to complete. The airplane was loaded that morning, the trailer was hooked to Fred's Datsun and he and a friend pulled out headed for Oshkosh! Within a few blocks, it became painfully obvious that the little sedan just couldn't handle the load ... so, back home, rush out and buy a pick-up, hook up the trailer again and head south the second time that day!! To simply say they made it to Oshkosh on time is to sell short the determination of these two intrepid travelers ... it leaves out the mud, flat tires, Alaska-size mosquitoes and cold nights out in the middle of nowhere. Whatever it was that kept those hardy souls moving who pioneered the way west in the early years of our nation's history was there in a double portion as the KR-1 inched agonizingly closer to Wisconsin.
When the plane arrived at Oshkosh, the tach read 5.41 hours. One hour of this was ground time so about 4 1/2 hours had been spent in the air. Fred recalled that the first flight back on the seventh of July had taken place at 7:30 in the evening and had lasted 25 minutes. This had been preceded by two high speed taxi runs to determine that ground handling was A-OK. Some previous taxi time had already been done and various minor adjustments made, most notably turning down of the brake drums to remove high spots. The flight was made without incident and due to thorough preparation of the plane, required no further rigging or adjustment.
Of course, Fred was not able to fly his beautiful little bird at Oshkosh due to the lack of test flying time - which makes his monumental road trip down and back more amazing. With so little time on the plane, it was decided at Oshkosh to wait until the plane was returned home and flown a few more hours before asking for performance data. This was done just prior to the writing of this article, so we will defer to Fred and let him tell you in his own words how the little plastic pursuit flies:
As of late November, I have 26 hours on my KR-1. General flight characteristics are light and very responsive. I've never flown a fighter or high performance aircraft, but the KR-1 would be close to what I feel one would handle like. It is the most enjoyable plane I've ever flown. The plane is tricky on the ground and that is a new experience, but it is one that has added more challenge and spirit to flying.
Takeoffs are actually uneventful except for again being quick. Rudder response is good if l don't drag along on the power. When full power is added, the tail comes up right now and in a few hundred feet she lifts off gently.
Landings are something else again. Even though the plane has a low stall speed, 65-70 mph indicated approach speed seems best. Anything lower than this, the nose is too high for a good look at the runway. On the flare out she will float a couple hundred feet before wanting to sit down, at which time stability is good.
After touching down and until stopped, this little model airplane will give anyone a lesson in rudder pedal use, more so than any other tail dragger I've ever flown. A good friend of mine, Dave Daly, took her up for a short flight (only after many high speed taxi runs) and after landing, this was his first comment - "Sure isn't a plane for some one without tail-dragger time.
Evaluation of takeoffs and landings make many high speed taxi runs and try to find a long, wide runway for your tests. Oh, yes - don't forget to put the gear down.
Stalls have a very interesting nature. While gradually entering the stall using about 1500 RPM, the little bird will get right on the edge of falling off` but just won't. A good buffet is experienced which gives me plenty of warning of near-stall condition, although it did surprise me that even during the buffet the plane still had good control. Well, I tried this many times with the crazy idea forming that she just wouldn't stall.
On a later flight I got big and brave and decided that this thing is going to stall or else. Entering with low power and very high nose attitude everything went as before. Then almost full power was added and with the nose sticking darn near straight up, I waited. The plane gave plenty of buffet warning when all of a sudden everything broke loose. One second I was looking up, then the next - old Mother Earth was really coming up to meet me. The indicated air speed was way below 40 MPH when she fell out of the sky.
Not being much on stunt flying and having no training in such, the straight down look at earth, I must admit, shook me up some. Actually, my ELT came out of its bracket and slammed against the canopy with enough noise I just knew my entire tail section had parted company. As the plane leveled out from the rather abrupt descent, everything checked out and looked O.K.
My evaluation of the stall business in a KR-1 is that the plane will give you plenty of warning, but when it does break - look out - because I had never experienced swapping ends so quickly.
In addition, Fred has some pointers for all you other KR-1 builders.
No major troubles have been encountered since all flights began. Some cold weather problems had to be corrected. Things like insulating the intake pipes from carburetor to heads and readjusting carburetion settings. Several hours were spent getting the right setting on the Revmaster injector carburetor.
A couple of very small cracks have appeared in the Dynel and epoxy skin around the wing fillet area due to the extreme cold weather. I have inspected the wings and all other surfaces very closely in an attempt to find similar problems, but none have appeared. My thoughts are that the fillet areas were sanded too much and the skin was just a little too thin to hold up against the expansion and contraction due to temperature changes.
For anyone completing a KR-2 with a bubble canopy - don't be alarmed to find the hatch moving around with temperature changes. I had a perfect fit when the plane left the hangar, but when the hot sun hit that plastic bubble, it expanded over an 1/8 of an inch. Now that the cold temperatures have hit Alaska, it has contracted to about a 3/16" gap.
This problem brings to mind that only pliable epoxy glue (after curing) should be used. The epoxy sold by Aircraft Spruce and Specialty Company is of the right type for use with Dynel. There are hundreds of blends of epoxy, and some cure to a very hard, brittle surface which is nice for sanding but could present a serious problem due to flexing and temperature changes.
Alaska has many warm days (80° - 90°) but as everyone knows, it does become extremely cold in the winter (40° 50° below zero range). So, with these extremes my experience with the KR-1 should help other builders using the Dynel and foam process. Any new problems or experiences will gladly be passed on to any who is concerned.
Here are some tips on building the KR-1
* Cut all wood parts at one time where sizes are known to be exact. All the saw dust and trouble is then limited to just a few times during the building. This is especially beneficial in cutting to length all the upright 5/8" x 5/8" pieces used for fuselage sides. As the length is determined cut two (2) instead of one (1). This also helps to insure that the front and rear main carry-through spars are level and parallel to each other.
* Don't rush in the construction of the wings. Building the wings on the fuselage involves a lot of working space and very careful alignment. No special tools are needed other than two good levels and a machinist's protractor level The protractor level in my opinion, is a must to assure good alignment. The plans originally called for a 5° angle of incidence but my plane was built using 3°. After flight tests. I believe that a 1 1/2° angle would have been better. Those little wings have a great amount of lift. If the incidence is too much, one will find himself flying with a nose down attitude
* Allow no less than 1" clearance around gear leg openings in the wing with legs in the down position. The gear spring bar does let the gear legs move in all directions, so if enough opening is not allowed, resulting damage to the wing is bound to occur. Nothing that a little foam removal and Dynel patch-work can't fix, but to avoid this problem, give it room to move
* The aileron cable pulley wheels had to be positioned within a 1/4" from the rear side of front main carry-through spar. This is to allow for clearance between cable and gear legs while in the retracted position. Be sure to check this possible problem before covering up the wing root area. Luckily, a friend caught this situation during my construction.
* I have found a 50-40 prop to have inadequate pitch for the power produced by the 65 h.p. Revmaster. It's just great for short takeoffs and climbing, but I lose out on cruise. I plan to install a 50-55 next summer and expect about 10-15 MPH better cruise speed. The short takeoffs and good climb rate is fine to show the big boys what the little KR-1 can do, but there is no reason to waste all that power at cruise RPM.
At present the plane is parked under the belly of a C-47 on Merril Field. To find a covered space in Anchorage is most difficult. Our Chapter President, Martin Hettinga has his Volksplane parked under the wing of an adjacent C-47.
Our visit to Oshkosh was most enjoyable I thank everyone for their sincere interest in the plane my efforts and the trip. I was truly impressed with everyone in our EAA organization. It is a proud feeling to be a member of such a movement
The return trip was without injury to the plane or either of us. Although we did go through two truck tires and four tires on the trailer. Coming up the Alcan wasn't as good as the trip down. As you can see in the picture, the road had turned to a mud hole due to snow freezing and thawing. It took almost four (4) solid days and nights of driving to make it over those 1200 miles of mud and gravel.
Fred Keller (EAA 77940) is a native of Kentucky who went north to Alaska for opportunity that was not available to a young man in rural areas of the "lower 49" of the 1960s. He applied himself and found what he sought.
He started flying in 1969 and has accumulated about 400 hours of flying time -- mostly in taildraggers. He has owned a Taylorcraft, a Cessna 150 and an Aeronca Sedan.
Fred says his KR-1 cost him about $2300 to build in Alaska -- including a new engine, and phone calls and freight charges to the "lower 49." His little bird joins some 15 other homebuilts in the Anchorage area, all a part of EAA Chapter 42 activity.
As we mentioned in the beginning, all of aviation faces some tough sledding in the months and, possibly, years to come. No one seems to know just how seriously we will be affected by the fuel situation ... but one thing is certain. EAA sport flyers have the will to keep on flying no matter how tough things get, and as long as we have people with the determination of a Fred Keller, we will find the way.
We WILL fly.
            FRED KELLER'S KR-1 N-5552

            Source: Fred Keller
            1200 W. Dimond, No. 1013
            Anchorage, Alaska 99502

            Building time				1700 hours
            Date Started				September 13, 1972
            Date Completed				July 6, 1973
            First Flight				July 7, 1973
            Total Flight Time to Date		26 hours
            Cost		$2300 (including freight & miscellaneous)

            Wingspan				17 ft
            Length					14 ft 5 in
            Height					44 inches
            Engine					VW "Revmaster"
            Displacement				1700 cc
            Horsepower				65
            Dual Bendix Ignition
            Power Loading				10 lb/HP
            Prop					50-40
            Gross					650 lbs
            Empty					402 lbs
            Useful Load				248 Ibs
            Cabin Load				(Full Fuel) 191 Ibs
            Fuel Capacity				9.5 gal
            Stall					43 indicated MPH
            Cruise					129 MPH
            Takeoff Roll				300 ft
            Rate of Climb				1550 FPM (speed 80 MPH)
            Fuel Consumption			3 GPH
            Range					75% (no reserve) 385 miles